Resource of
free Tutoriel
for all.
You want to share your Tutoriel. Contact
me
( These
Tutoriel are free to private use, forbidden to the sale or commercial use.
)
*** RWX
Lexicon ***
This
lexicon is for real rwx converted because many others controls appear
via others programme which are useless on a rwx object for AW 3.4 version
(I advise you Accutrans which
is very good)
*
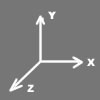
Vertex *=this
is a control who determine an exact point in a 3D space (x=breadth, y=height,
z=depth), it can be associate with control UV who
will define stature of Texture which apply
on.
ex
: Vertex 1 2 3 (without texture version)
ex
: Vertex 1 1 1 UV 1 1 (with texture version)
*
Quad * =
this is a control who permit to connect 4 points Vertex between
themselves and do a square face. (we always connect the points in anti-counter
clockwise to have the determinate face visible.)
ex:
Quad 1 2 3 4
*
Triangle * =
this is the same thing that a Quad but for a triangular face
ex:
Triangle 1 2 3
*
Tag 100 * =
this control add after a Quad or a triangle, you can read on.
ex:
Quad 1 2 3 4 Tag 100
*
Tag 200 * =
this control add after a Quad or a triangle. You can put an image via
an url of your choice (for only file format.jpg)
ex:
Quad 1 2 3 4 Tag 200
*
Collision off * =
this control permit to repay the part of the objet what you want in passable
part inside of an object which is not passable. (ex: an house Collision
off for a door then the rest is passable Collision
on).
*
collision on * =
this control is the same that above but forbidden the passage, when this
control is already forcast in the file.
*
Scale * =
with this control, you can reduce an object without touch the rest. it
take a percentage coefficient in accordance with height of origine.The
Scale help himself of values "x , y , z " respectively.
ex:
Scale 2 2 2 (multiply its height by 2)
ex:
Scale 0.5 0.5 0.5 (divide its height by 2)
*
Texture * =
this control permit to determine the texture of your choice to apply
on the part determinate of your object. You write the name of the texture
whitout put .jpg of this texture.
ex:
Texture wood
(wood
= texture's name)
*
you can put a mask on :
ex:
Texture wood mask mwood
(a
texture .jpg recover of a mask in texture
.bmp "mwood")
the
texture .bmp must be zip and put on the file textures, the fonction of
the file .bmp is to hide the zones what you don't want to show.
we
apply the black color for zones not visible and the white for zones visibles
.jpg which is apply.
*
if you don't want texture on :
ex:
Texture NULL
*
Rotate * =
this control permit to rotate in the object to mouve in the next Vertex
to do the rotation you want, always with the coordinates x y z respectively.
ex:
Rotate 1 0 0 90
(this
go to incline for the next vertex in the axe x of 90 degree)
ex:
Rotate 0 1 0 15
(this
go to incline for the next vertex in the axe y of 15 degree)
*
LightSampling Vertex * =
this control permit to apply the light on according to the Vertex of
the object.
*
LightSampling Facet * =
this control permit to apply the light on according to the faces of the
object. (it's already activate so it doesn't need to write on the file).
*
Color * =
this control permit you to apply a color on your object.
ex:
Color 1 1 1 (white color)
*
TextureModes Facet * =
this control permit to apply textures according to the faces of the object
( it's already activate so it doesn't need to write on the file.)
*
TextureModes Vertex * =
this control permit to apply textures according to the Vertex of your
object (you can put the object round if it is octogonal, it polishes
the faces.)
*
TextureModes NULL * =
for don't have an application mode of texture.
*
addmaterialmode double * =
this control come with TextureModes Foreshorten in
order that the texture would be see on the two sides.
*
addtexturemode foreshorten * =
this control permit to get visible the face of the other side without
add Quad or Triangle. It is come with the control addmaterialmode
double.
*
TextureModes Foreshorten * =
this control permit to have a forced lighting on your object.
*
TextureModes Lit * =
this control permit you to don't have a forced light so this control
is useless because it is also manage without she is in the file.)
*
AxisAlignement ZOrientY * =
this control permit you to give to your object a rotation in real time
(run only with a complete object, always with x y z).
*
ModelBegin * =
this control means that it's the beginning of the object.
*
ClumpBegin * =
this control means that it's the beginning of the construction part of
the object.
*
ClumpEnd * =
this control means that it's the end of the construction part of the
object.
*
ModelEnd * =
this control means the final closing of the object.
*
Opacity * =
this control permit to render the determinate part more or less clear.
ex:
Opacity 0 (invisible)
ex:
Opacity 0.5 (half transparence)
ex:
Opacity 1 (no transparence)
*
Surface * =
this control permit an orientation of the light on your object (always
on x y z on principe).
ex:
Surface .5 .3 0
*
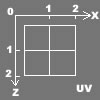
UV * =
it add after texture to determine the height, position of the Quad ou
Triangle. (the UV use " x , z " parameters, see above the memo.)
ex:
Quad 1 1 1 UV 1 0
1
texture =1 / 2 textures =2 /3 textures =3
******************MEMO*******************
X
Y Z
|
UV
|
 |
 |
RWX
|
Réalité
|
1
|
10
métres
|
0.1
|
1
métre
|
0.01
|
10
cm
|
0.001
|
1
cm
|
You want to share your Tutoriel. Contact
me
( These
Tutoriel are free to private use, forbidden to the sale or commercial
use. )
|
